Why a good Solana explorer matters for NFT trackers and transaction forensics

Wow! I stumbled into Solana tooling last year while chasing a weird NFT bug. My first impression was speed, raw speed, and some chaos. Initially I thought that all explorers were basically interchangeable, but then I spent a week tracing failed transactions and token mint histories and realized the tooling differences actually matter a lot. Here’s what bugs me about many UIs: they hide the gritty data, somethin’ important.

Really? Sol transactions are deceptively simple on the surface, especially for new users. You click send, pay a tiny fee, and the ledger updates fast. But when things go wrong — a duplicate signature, a program failure, an account rent exemption hiccup — the only way to untangle what happened is a good explorer that shows instruction-level details, inner instructions, and account state changes. That level of traceability is what makes NFT tracker tools so valuable.

Screenshot of an explorer showing inner instruction traces and account state changes

Hmm… I’ve used a bunch — and yes, I’m biased toward ones that give raw logs. The typical workflow for me is: submit, watch for confirmation, then deep-dive if something’s off. Initially I thought automated scanners would catch every issue, but then I realized that on-chain debugging needs human intuition—reading stack traces, comparing pre- and post-account states, and correlating those with NFT metadata updates to spot mis-mints or rug-prices. Those correlations are why NFT tracker features are not optional for serious collectors.

Here’s the thing. A solid explorer shows you the block, the transaction, and the minutiae in between — it’s very very useful. When I worked on a marketplace incident last fall, I had to manually follow a token transfer across multiple program invocations, check associated token accounts, and then reconstruct the authority chain because the front-end had cached a stale owner — it took hours, but the explorer’s inner instruction trace was the clue that unlocked everything. That kind of forensic work is satisfying, but it can also be maddening. Tools that combine transaction inspection with NFT-centric views — like ownership timelines, metadata mutation logs, and marketplace sale links — dramatically cut investigation time, though building those views requires careful indexing and access to validated metadata sources.

Tool pick

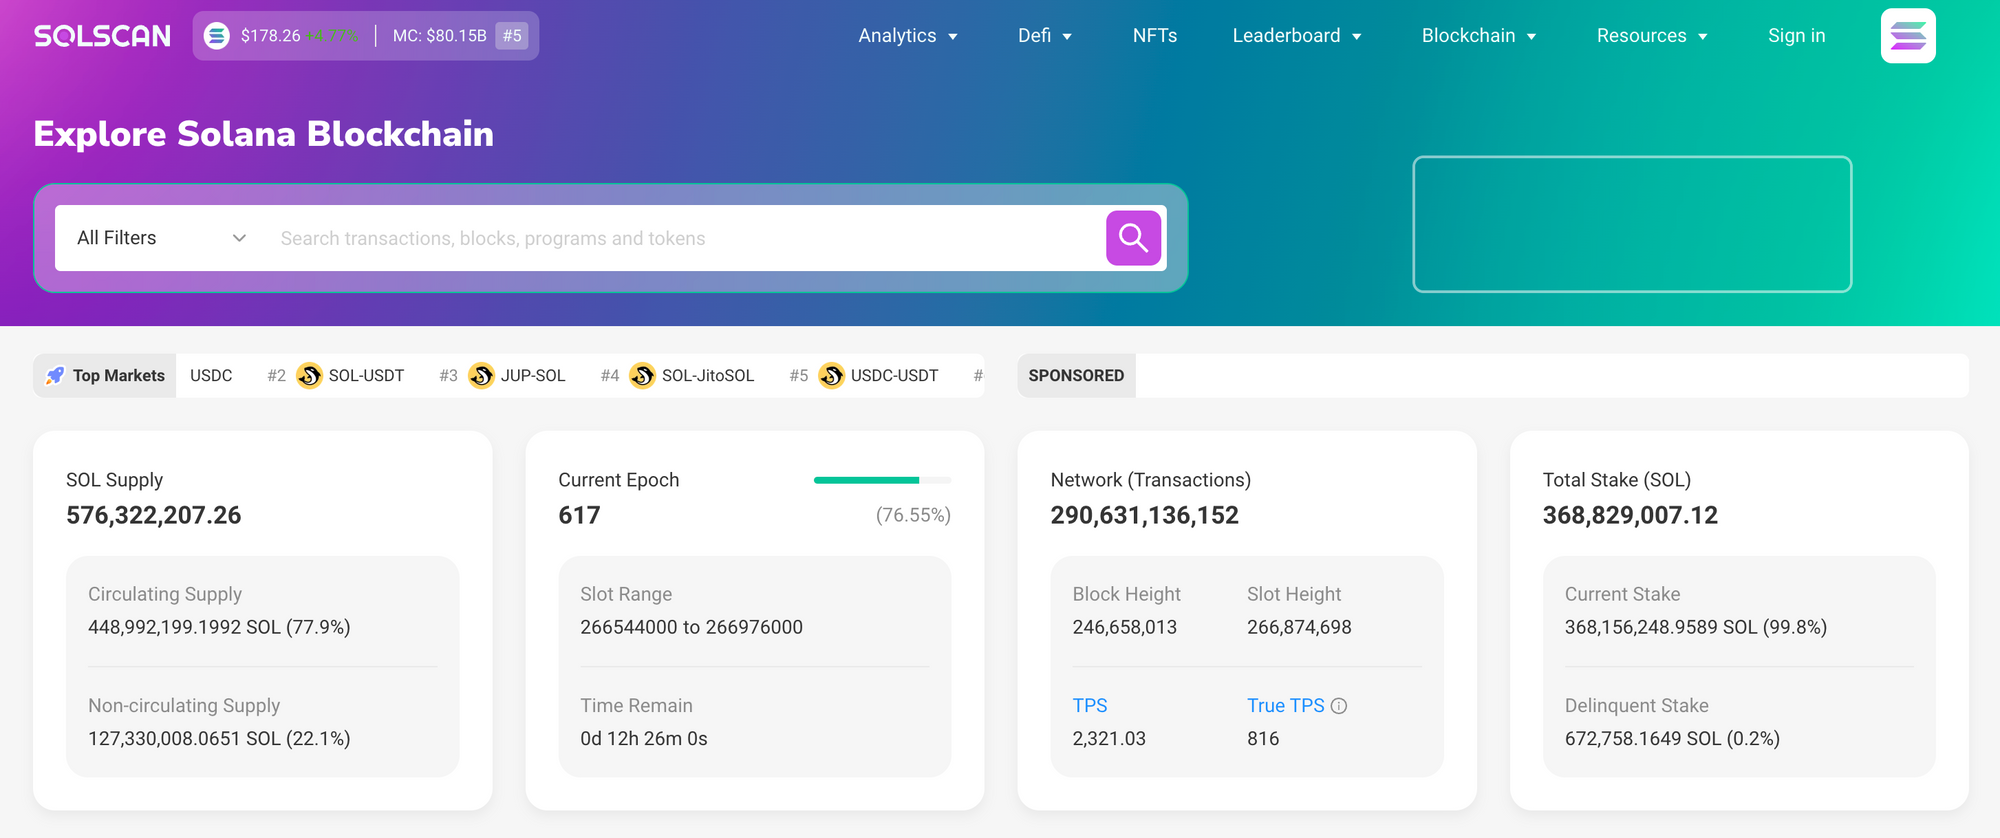
Whoa! Okay, so check this out—I’ve grown to trust explorers that surface inner instructions and return logs verbatim. My instinct said those were optional, but repeated debugging proved otherwise. Initially I thought on-chain explorers were purely read-only conveniences, but after correlating RPC node responses, archival indexer outputs, and a third-party NFT metadata cache I had to re-evaluate that stance because read-only still needs fidelity to be trustworthy. If you’re building an NFT tracker, pick tools with raw traces and timelines. Seriously? Quick FAQ: pick an explorer that exposes inner instructions and raw logs. If you only rely on the transaction summary, you might miss program-level failures and inner transfers that affect NFT ownership, which is why forensic-grade explorers index inner instructions alongside account snapshots. Also verify RPC responsiveness and cluster confirmation counts before trusting stale views. If you want a pragmatic starting point, try a well-maintained explorer like the solscan explorer official site which I lean on frequently because it balances performance with deep inspection features.

How I Track BEP-20 Tokens and PancakeSwap Activity on BNB Chain (and why the explorer matters)

Whoa! This whole BNB Chain thing can feel like a fast-moving freeway at rush hour. My first gut reaction was panic — too many tokens, too many transfers, and some projects that seemed too good to be true. Seriously? Yup. But then I dug in, and some patterns started to emerge. Initially I thought the only way to stay safe was to hold my breath and hope for the best, but then realized that the blockchain literally gives you the receipts — you just need to read them right.

Okay, so check this out—there’s a difference between watching price charts and auditing on-chain signals. Hmm… price charts tell you sentiment; the chain shows the plumbing. If you care about BEP-20 tokens and PancakeSwap liquidity moves, you want to be comfortable with the explorer and the specific pages that reveal token creation, transfers, approvals, and liquidity pair contracts. I’m biased, but learning a few on-chain patterns saved me from one sketchy token launch (oh, and by the way… that rug pull had a predictable signature).

Short fact: transaction receipts are immutable. That matters. On one hand it’s freeing — everyone can verify balances and flows — though actually it can be noisy and intimidating at first, especially when transactions pile up or when a single wallet splits liquidity across dozens of pairs in the blink of an eye. My instinct said to look for the simple indicators first: contract creation date, verified source code, holder distribution, and pair liquidity changes. Start there, then dig deeper.

Here’s how I approach a token or a PancakeSwap pair when I’m trying to figure out if somethin’ legit is happening. First, open the token’s contract page. Look at the verified contract code if it exists. If it’s not verified, raise a red flag. Then check holder concentration. If one wallet controls 90% of the supply, that’s risky. Next, scan token transfer history for large sells or rapid transfers to multiple exchanges or burn addresses. Also watch for approvals that allow contracts to move large amounts — that often precedes automated sells.

A screenshot-style depiction of token transfers and liquidity pool movements, drawing attention to buyer and seller patterns

Using the bscscan blockchain explorer to track PancakeSwap and BEP-20 activity

If you haven’t used a proper explorer, try the bscscan blockchain explorer as your starting point; it surfaces contract creation, token holders, verified code, transfer logs, and pair events in an accessible way. At first it looks like raw data, but the trick is to know which panels to read fast: Transactions, Internal Txns, Contract, Read/Write Contract, and Token Transfers. When a new token launches, I watch the initial liquidity add to the PancakeSwap pair — that origin tx tells you who added liquidity and whether tokens are locked. If the LP tokens were immediately sent to a personal wallet, that’s a bad sign.

Listen — some of this is detective work, and some of it is pattern recognition. I check PancakeSwap pair contracts for sudden spikes in the ‘Swap’ events and for the ‘Sync’ operations that adjust reserves. Medium level checks include looking at slippage tolerances in the originating transactions, and whether the router functions were used directly or via a helper contract. Long-form thinking here matters; you’re not just seeing numbers, you’re inferring intent across time and multiple wallets.

One technique I use often: follow the money. Trace a large sell back through several transactions and see if it funnels into centralized exchanges or into burner wallets. That will tell you whether devs are cashing out behind a token’s pump, or whether liquidity is being steadily built. Sometimes I find a developer sending LP tokens to a timelock, which is reassuring. Other times I watch the dev shift LP tokens between multiple fresh wallets — that part bugs me.

There’s also the approvals game. Approvals can be revoked. I tend to revoke approvals from smart contracts that have broader-than-necessary permissions, especially when interacting with DEXs or custody services. If a token requires unlimited approval just to trade, I get cautious. I’m not 100% sure why some teams prefer that, but my rule of thumb is to restrict approvals and only grant what you need for one trade or one period.

On the practical side: set up address watches and token alerts. Some explorers let you save addresses, watch token transfers, or notify you when an address makes a significant move. That saved me once — I got a ping showing a top holder transferring 40% of supply to an unknown address and I sold before the price collapsed. Simple, but effective. Also, use the ‘Top Token Holders’ chart to see whether distribution is healthy or dangerously concentrated.

Okay, pause. I’ll be honest — this is not foolproof. Scammers evolve. They obfuscate flows and use mixers or intermediate contracts. But working through contradictions helps. On one hand the chain is transparent; though on the other hand bad actors can still hide intent behind many small moves and multiple contracts. So: track both macros (total liquidity and holder spread) and micros (specific txs and approvals). That dual lens has saved me time and money.

Another nuance: PancakeSwap itself emits events that show liquidity additions and removes. If you notice a sudden burn of LP tokens or persistent liquidity withdrawals immediately after a pump, that’s classic exit behavior. Conversely, if devs lock LP tokens for a substantial period and then publicly document the lock, that’s a plus — but verify the lock contract and timestamp yourself. Don’t take screenshots at face value. Verify on-chain.

Some practical tips I still use every time: keep a checklist, copy the contract address directly from the project’s site and check it against the explorer, verify the code, scan recent transfers for odd behavior, check the pair contract for LP token movements, and set alerts on large transactions. It sounds rote, but doing it fast matters. And yes, sometimes I get it wrong — double mistakes happen — but the process reduces surprises.

FAQ

How can I spot a rug pull on BNB Chain quickly?

Watch for concentrated token ownership, immediate transfer of LP tokens to personal wallets, large sells right after launch, and unverified contract code. Also look for high allowance approvals and unusual routing through helper contracts.

Is verified contract source code always trustworthy?

No. Verified code helps but doesn’t guarantee safety. Read the functions that mint tokens, set fees, or change ownership. If you can’t audit code yourself, look for community audits or reputable third-party reviews.

What’s the single most useful page on the explorer?

The token contract page. It aggregates transfers, holders, contract verification, and linkages to pair contracts. From there you can branch out into pair pages and transaction histories for deeper investigation.

Why your next mobile crypto wallet should natively support multiple chains

Whoa!
Mobile wallets used to be simple.
They stored a single private key and that was enough for many people.
But now the world is multi-chain, messy, and fast-moving, and your phone wallet needs to keep up without turning into a security nightmare that you can’t manage.
My instinct said “just use a hardware device,” though actually—wait—mobile can be both secure and convenient if built right.

Seriously?
Yes.
Here’s the thing: most users want convenience first, security second, and speed third, in that rough order.
That mismatch drives risky behavior—copying seeds into notes, reusing weak passwords, or pasting keys into shady apps (oh, and by the way, that part bugs me).
On one hand wallets advertise multi-chain support, though on the other hand many only do token viewing or crude bridging that leaks privacy.

Hmm…
Initially I thought multi-chain simply meant adding more tokens.
But then I realized it means handling different address formats, gas token models, signature schemes, and cross-chain UX flows—at the app layer and the protocol layer.
Actually, wait—let me rephrase that: supporting many chains well means you’re solving for cryptography, UX, network reliability, and user mental models all at once.
This is why wallet architecture matters very very much.

Short answer: choose a wallet that isolates keys, validates transactions locally, and manages cross-chain metadata without sending your seed to a server.
Longer answer: look under the hood—how does the wallet derive addresses, where are private keys stored, and how are nonces and fees calculated across different EVM and non-EVM chains?
If a wallet relies on cloud key custody or centralized signing for “convenience,” be cautious—there’s a tradeoff and sometimes it’s hidden.
I’m biased, but I prefer wallets that keep cryptographic operations on-device and only use servers for optionally fetching market data or block explorers.
Trust is a string you earn slowly and can lose in one bad release.

Okay, so check this out—security should be layered.
Short-term passphrases, biometric gates, and secure enclave storage provide good protection on modern phones.
But the UX must not make users bypass those protections for convenience, or else you’ll get insecure habits.
One real-world pattern I’ve seen: people disable biometrics because “it glitches,” and then store recovery words in cloud notes; that’s a disaster waiting to happen.
We can design to avoid that, but it requires product discipline.

Concerning multi-chain signing there are practical gotchas.
EVM chains mostly play nice together, but Solana, Cosmos, and UTXO models differ in subtle but important ways, especially with fees and transaction lifetimes.
Some wallets pretend to be “universal” by wrapping every network behind a common RPC abstraction, though actually those wrappers often omit edge cases and replay protections.
On the bright side, well-architected wallets implement per-chain adapters and test real network edge cases—timeouts, fee spike fallback paths, and signature version mismatches—so things don’t break mid-swap.
That reliability matters a lot when money is on the line.

Here’s a small checklist I use when evaluating a mobile multi-chain wallet.
Does it keep private keys in secure hardware or OS keystore?
Does it perform signing locally and provide clear transaction previews with byte-level details for power users?
Does it support chain-specific features like memo fields, token approval revocation, and custom gas limits?
And importantly, what’s the upgrade story—can you audit updates or opt into staged rollouts?

A smartphone showing a multi-chain wallet interface with tokens and transactions

How I ended up trusting one app more than others

I’ll be honest: most of the market tested as sloppy at first.
I tried a bunch—some very polished, some barely functional—and the one that stood out kept cryptography local, offered clear recovery flow options, and educated users without scaring them off.
That combination of design and engineering gave me confidence, and yeah, I used it for real small-value transfers before I moved larger balances.
If you want to check a modern example that balances convenience and security, take a look at trust—their approach to multi-chain UX and on-device security felt thoughtful to me.
Not an endorsement of blind trust—just a nudge to check the architecture and privacy model carefully.

Wallets that excel do three tough things well.
First, they abstract complexity for typical users while exposing advanced controls for power users.
Second, they handle cross-chain swaps or bridges with explicit confirmations and clear fee breakdowns instead of hiding slippage.
Third, they offer recovery options that are resilient against device loss and social engineering, like Shamir backups or optional custodial recovery for novices.
These features are not trivial to implement simultaneously, but they matter.

On the topic of bridging—ugh, that’s a minefield.
Bridges add trust layers and expand the attack surface.
If you rely on a bridge often, prefer solutions that let you audit contracts, or use well-known liquidity providers with strong security histories.
Also, avoid wallets that silently use third-party bridges without a clear consent screen; consent should be explicit, and fees must be visible.
Somethin’ about opacity here makes me uneasy.

Practical tips for mobile users right now:
Keep a separate wallet for daily small spends.
Store long-term holdings in cold storage or hardware wallets when possible.
Use wallets that support hardware wallet pairing for large transfers, so your phone can remain the daily interface without holding significant keys.
Enable biometrics and PIN combos, and never paste seeds into cloud notes.
Repeat after me: never reuse a recovery phrase across apps.

FAQ

Q: Can a mobile wallet be as secure as a hardware wallet?

A: Short answer: sometimes. Longer answer: mobile wallets with secure enclave support, strong OS keystore use, and well-designed UX can be very secure for most users, but a hardware wallet still offers stronger isolation for high-value holdings.
If you plan to hold substantial amounts long-term, pair your mobile app with a hardware device or cold storage solution.
Think in layers—mobile for ease, hardware for vaulting.

Q: How do I know a wallet truly supports multi-chain?

A: Look beyond the token list.
Check whether the wallet documents network adapters, shows transaction byte details, and has per-chain settings for gas and nonce.
Also inspect community audits, changelogs, and whether the provider publishes open-source components or security reports.
If those items are missing or vague, treat the “multi-chain” claim with skepticism.

Getting into HSBCNet: a practical, no-nonsense guide for corporate users

Okay, so check this out—logging into a corporate banking portal feels like a ritual now. Wow! The mix of tokens, certificates, passwords, and admin approvals can make your head spin. My instinct said this would be a simple walkthrough, but actually, there’s a lot that trips people up. Initially I thought a checklist would fix everything, but then I realized workflows and roles matter more than any single step.

Here’s the thing. Corporate banking is built for control first, convenience second. Seriously? Yes. That design keeps accounts safe for companies that move money daily, but it also means first-time access often requires coordination across teams. Some of this is obvious. Some of it isn’t. On one hand you want tight security; on the other hand you need to get payroll out on Friday—so governance has to be practical, not theoretical.

If you’re reading this, you probably need to either get set up on the HSBC corporate platform or troubleshoot access. Hmm… I’ve lived through a few onboarding headaches at finance teams, so I’m biased, but I want to share what helped me and my clients. There are three big buckets to focus on: identity & authentication, roles & entitlements, and operational readiness. I’ll walk through each.

A laptop showing a corporate banking login screen, with sticky notes nearby

1) Identity and authentication — the gatekeepers

Short version: prove who you are, and prove you have permission. Tokens (physical or app-based) and digital certificates are common. Tokens expire. Certs get replaced. Policies change. Wow!

Start with the admin. The company’s primary administrator (or superuser) must approve new users. That person often handles certificate installation and token issuance. If that admin is out on leave, things stall fast—so plan ahead. Seriously, put backup admins in place.

Multi-factor authentication is mandatory for real corporate access. My instinct said “just use SMS” in a pinch, but corporate platforms rarely accept SMS alone because it’s weaker. Instead, expect hardware tokens, soft tokens via secure apps, or client-side certificates. If you’re using a certificate, make sure the machine it’s installed on is a managed device; otherwise the cert can be lost and recovery is painful.

Passwords? Make them strong, and rotate them per policy. Oh, and store them in a company-approved password manager—if you’re still emailing creds, stop. Now.

2) Roles, entitlements, and the art of not giving too much access

Companies often fall into two traps: too little access and too much access. Too little: users can’t do basic tasks and productivity grinds. Too much: one compromised account can move funds freely. Both are bad. My gut says err on the side of least privilege, then iterate carefully as needs arise.

Map roles to real job functions. For example: treasury analyst, payments approver, report viewer. Each role should have a documented list of entitlements and an approval workflow. Initially I thought one “finance” role could serve everyone, but then exceptions and shadow processes multiplied. Actually, wait—let me rephrase that: define core roles, then allow temporary escalations with time-bound approvals.

Audit regularly. Monthly reviews catch stale access and departed employees. If you only review annually, you’re gambling. Also, keep at least two approvers for high-value actions so there’s redundancy without single points of failure.

3) Operational readiness — make the portal part of your daily rhythm

Practice payments in a non-production environment. Wow, this matters. Training in a sandbox reveals tiny UI quirks that cause big mistakes under pressure. When payroll day arrives, you want muscle memory, not confusion.

Build runbooks. Simple steps for common tasks—initiate payment, approve payment, reconcile statements—save time. Include screenshots, token notes, and escalation contacts. (oh, and by the way…) keep the runbooks in a central, permissioned repository.

Automate where it makes sense. Use file formats the platform accepts and test automated file uploads. A lot of teams manually process payments because the automation failed once; that’s avoidable. Fix the integration and your monthly close gets quieter.

Using hsbcnet — practical tips and safe habits

If you’re going to the portal, bookmark the official link and never click random links in emails. I recommend adding the portal to your organization’s approved-sites list and training staff to verify the URL. The official access point is available at hsbcnet. Do not copy credentials into random forms, and never share tokens via messaging apps.

Browser hygiene matters. Use the supported browser versions that HSBC lists. Keep browser extensions minimal; some extensions inject scripts that break certificate-based auth. If a login fails with a certificate error, try a managed VM or a different machine that your IT department has approved.

When things go wrong, document errors exactly. Screenshots of error codes, timestamps, and the user ID help support teams diagnose issues faster. Call out the sequence: what the user clicked, what appeared, and any recent changes (password reset, new token, software update). That context slashes troubleshooting time.

Common questions

Q: I lost my token. What now?

A: Report it immediately to your admin and the bank. Revoke the lost token, request a replacement, and consider a temporary approval workaround that requires dual sign-off. Don’t try to reuse old credentials; tokens are unique and revocation prevents misuse.

Q: My certificate won’t install. Any quick fixes?

A: Check that the certificate matches the user profile, that it’s installed into the right certificate store, and that the machine’s clock is correct. Also confirm the browser is supported and not blocking client certificates. If you’re stuck, gather error messages and contact support—having the key details speeds things up.

Q: How do I add a backup approver?

A: Follow your internal change governance. Add the backup approver through the admin console, document the change, and send a test approval task. On one hand this is simple; on the other hand you need to ensure the backup understands role responsibilities before an emergency.

I’ll be honest—onboarding to any corporate banking portal takes coordination and patience. Something felt off about how many teams treat governance as a checkbox, and that part bugs me. You can’t treat payments security like a one-time setup. It needs maintenance, visibility, and practice.

Final note: keep lists of contacts handy. Your bank relationship manager and technical support are partners, not obstacles. Build a working relationship early, test the support channels, and keep escalation paths documented. It’s boring work, but when payroll or a big vendor payment is due, that boring preparation is exactly what saves you.

Why Google Authenticator Still Matters — and How to Use It Without Losing Your Keys

Whoa! I know, I know — two-factor auth feels like a chore. But hang on. A quick gut check: if you care about your accounts at all, adding a second factor is the single most practical step you can take. Seriously? Yes. My instinct said that years ago, and every time I’ve had to untangle an account takeover since then, that first hunch was right.

Here’s the thing. Google Authenticator is simple. It gives you time-based one-time passwords (TOTP) that rotate every 30 seconds. That little rotating code is often the difference between “oh no” and “nope, not today.” Initially I thought that moving to hardware tokens would be the universal answer, but then I realized most people want something fast and free on their phones — and that’s where the authenticator app shines.

Short wins matter. Using an authenticator is fast. It’s not perfect though; there are trade-offs. On one hand it’s free and offline (so no SIM swap risk). On the other hand losing your phone can be a real headache if you haven’t planned ahead.

Okay, so check this out — here’s how it works in plain English: when you enable 2FA with a service, you scan a QR code into the app. The app and the service then use the same secret to independently generate the same six-digit codes at the same moment. If the codes match, you’re in. That’s cryptography doing its job quietly in the background. Hmm… sounds nerdy, but it’s actually very practical.

Person scanning QR code on a phone to set up Google Authenticator

Getting started: install and set up

First step: install an authenticator app. Do it on your primary device first. Scan the QR code (or paste the secret) and test that the generated code logs you in. That’s one of those small checks that prevents big headaches later.

Make recovery plans while you’re still in control. Write down backup codes and put them somewhere safe (an encrypted note, a hardware password manager, or a printed copy locked away). This part bugs me because people skip it. I’m biased, but backup codes are very very important.

Want to use multiple devices? Fine, but be careful. Not all authenticators allow easy migration. Some let you export accounts from one phone and import on another, others make you manually scan each QR code again — which is safer, though slower. If you see a “transfer accounts” option, read what it says about encryption and device PINs first.

Oh, and by the way — if a service gives you only a phone number for 2FA, flip that around. Use authenticator-based TOTP when possible. SMS is easy to intercept via SIM swapping or carrier vulnerabilities. It’s okay to use SMS as a temporary fallback, but treat it as inferior security.

Pros, cons, and the real-world tradeoffs

Pros first: it’s offline, it’s widely supported, and setup is simple for non-technical folks. Many consumer sites support TOTP out of the box. Cons? Recovery complexity and device migration can be frustrating. Also, if your phone is stolen and unlocked, your accounts could be at risk — so lock the phone with a strong passcode and enable device-level encryption.

On one hand, hardware keys like YubiKey are more secure (they resist phishing better). On the other hand, they cost money and add friction. For most personal accounts, an authenticator app offers a very good balance. Though actually, for high-value work accounts I recommend combining approaches — use hardware keys where supported and keep an authenticator for services that don’t support keys.

Something felt off about the “set it and forget it” attitude. People set up 2FA and then never revisit account recovery settings. Don’t be that person. Every year, do a quick audit: check which accounts have 2FA enabled, where your backup codes are stored, and whether your phone number or recovery email is current. It takes 10 minutes and can save you a disaster.

Migrating devices — the parts that trip people up

Moving to a new phone can be smooth or painful. If your current authenticator supports account export, use that and verify on the new device before wiping the old one. If not, your safest bet is to log into each service and re-scan the QR codes on the new device. Yes, it’s slower. Yes, it’s more annoying. But this manual method avoids accidentally transferring secrets to an insecure medium.

Some services offer account recovery via email or SMS; some give you one-time backup codes; others give you a downloadable CSV of secrets. Keep a record of what methods each important service uses. I’m not 100% sure every service will keep the same process forever, but having notes helps when somethin’ changes unexpectedly.

Also, be wary of third-party backup apps that store your tokens unencrypted in the cloud. Convenience is tempting, but if a service is storing your secrets without strong encryption, you’re trading convenience for risk. If you use cloud backup, ensure the provider encrypts the secrets client-side and you control the key.

Practical setup checklist (do this now)

– Install an authenticator on your phone and test it. Done? Great.
– Save backup codes in a secure place (encrypted vault or paper).
– Enable device lock and biometrics on your phone.
– For high-security accounts, add hardware keys as a second method.
– Audit 2FA settings annually and after any device loss or major account change.

These steps are small. They matter. They compound into real protection.

FAQ

What happens if I lose my phone?

Use your backup codes or secondary recovery method. If you didn’t save any, you must follow each service’s account recovery process — which can be slow and painful. So save the codes. Really.

Can someone phish my TOTP code?

Yes — if you paste the code into a fake site, it can be used immediately. That’s why hardware-based phishing-resistant keys are preferable for high-risk accounts. Still, TOTP is a huge improvement over password-only security.

Is Google Authenticator the only option?

No. There are several compatible authenticators and password managers that offer TOTP. Pick one that meets your needs for backups, migration, and device security. I’m partial to tools that allow secure export and strong local encryption, but your use case may differ.

So yeah — two-factor authentication with an authenticator app is not glamorous. It is effective. My experience is that most account compromises are stopped cold by a second factor. And that immediate sense of relief when you realize “oh — I can still get in because I saved the backup codes” is oddly satisfying. Not sexy, but reliable.

Finally, a small confession: I get annoyed by people telling others that “password managers alone are enough.” They help a ton, but pairing a password manager with 2FA is far stronger. Keep things layered. Do the basics well, and you’re already ahead of most folks.

Why a Desktop Multi-Asset Wallet Still Makes Sense (and Where It Trips Up)

Whoa!

So I was messing around with desktop wallets last week and something unusual popped up.

My instinct said this one would be boring, but it turned into a small revelation about trade-offs between convenience and control.

It struck me how many people treat a wallet like a web app instead of a private vault.

Desktop multi-asset wallets like Exodus blur lines: they offer a slick UI for managing dozens of tokens while bundling in swaps, portfolio views, and sometimes staking, which is great for everyday users who don’t want to juggle a half dozen apps.

Hmm…

I’ll be honest—I used Exodus on my laptop for a few months as a sort of daily driver, somethin’ I wasn’t originally planning to do.

Initially I thought it would be too polished and maybe dumbing-down security, but then I learned it can actually nudge users toward safer behaviours when configured right.

On one hand the integrated exchange is immensely convenient.

On the other hand, it introduces third-party custody risks when swaps are routed through external liquidity providers, a nuance most beginners don’t realize until they dig deeper.

Seriously?

Here’s what bugs me about the convenience narrative though.

For many users, the moment they see an in-app swap button they assume the app stores their funds like a bank and that it’s all magically protected, which is not how private keys work.

My gut said there was a misconception.

Actually, wait—let me rephrase that: my worry isn’t the UI, it’s the lack of consistent user education layered into the flow.

Security is multilayered, starting with your device.

A desktop wallet gives you file-based control over backups and seed phrases, which matters if you value ownership.

But desktops carry their own attack surface: OS-level malware, keyloggers, and misconfigured backups can all cause issues.

So what to do?

Use a hardened computer if you can, enable strong passwords, and keep your seed phrase offline in at least two geographically separated backups.

One practical routine I adopted is to use the desktop wallet for day-to-day swaps and a hardware wallet for cold storage of the bulk of my holdings.

This balances usability with security.

Exodus supports hardware wallets like Trezor, and pairing them forces you to sign on the hardware device for key operations, dramatically reducing online exposure.

In plain English: keep the lion’s share off the desktop.

Oh, and by the way… backups matter more than you think — they’re very very important.

Screenshot of a desktop multi-asset wallet interface showing portfolio and swap functions

How I use Exodus daily

I keep a small hot wallet on my desktop for quick swaps and portfolio checks, and that works well for frequent tinkering.

When friends ask how to get started I point them toward a straightforward setup and the official installer—here’s the exodus wallet download I use and trust.

Make sure you verify the installer hash and avoid knock-off installers on sketchy sites.

Also: enable automatic updates if your OS is trustworthy, because patches matter.

There are trade-offs, of course, like with any app that trades some complexity for accessibility.

For institutional or very large holdings, a different posture is required—multisig setups, dedicated HSMs, or escrow accounts, none of which are sexy for hobbyists.

But for most U.S. users who want to hold multiple tokens and occasionally swap, a desktop multi-asset wallet hits a sweet spot.

I’m not 100% sure about every user’s threat model, though.

So assess your needs, and if you value ownership, maintain control of seed material.

FAQ

Is a desktop wallet safe?

It can be quite safe when paired with good habits: hardware backups, isolated devices for large amounts, and cautious clicking.

But it’s not immune to all threats.

Can I swap any token inside Exodus?

Most mainstream tokens and many ERC-20 or compatible chain tokens are supported, though liquidity and routing differ and tiny altcoins may not be available.

Check the token list before assuming you can swap.

What about fees?

You’ll pay network fees plus any service spread from the in-app swap, so compare prices on aggregators for larger trades.

Small convenience trades are often fine, but big trades deserve shopping around.

At the end of the day, wallets are about choices.

I’m biased toward tools that combine good UX with optional advanced controls, because they lower the barrier without encouraging recklessness.

That approach isn’t perfect, but it’s practical for many people in the U.S. who want exposure to crypto without becoming devops experts.

Okay, so check this out—try a small experiment: move a small amount, run a swap, and then restore your seed on a fresh device.

You’ll learn faster than reading ten guides.

I’m not 100% sure you’ll love the UI, but you’ll understand the security model better.

And that, oddly, is what crypto ownership should feel like.

Inside BEP20: How I Trace Tokens on BNB Chain (and Why You Should Too)

Whoa!

I was watching a BEP20 token transfer the other day on BNB Chain.

Somethin’ felt off about the gas usage and the timing.

Initially I thought it was just a normal spike caused by network congestion, but then I dove into the transaction details and realized the outbound calls were interacting with three different contracts in ways that didn’t match the labels.

Here’s the thing: the labels in the DApp UI were misleading to start with.

Really?

I dug deeper using my usual tools and instincts.

On one hand you can blame poor UX or lazy contract naming, though actually the traces showed rerouted internal transactions that suggested a proxy pattern with an added fee mechanism.

Here’s what bugs me about it: newcomers see misleading data and might make bad trades.

I’m biased, but that confusion costs people money sometimes.

Hmm…

Okay, so check this out—there’s a handy way to map all of this.

By reconstructing the internal transactions and following the token approvals step by step, you can see not just who moved tokens but which contracts were invoked and what data payloads were sent, which matters for spotting hidden taxes or honeypots.

This is where a reliable chain explorer becomes essential for real-time sleuthing.

I started annotating events and comparing logs across blocks to build a timeline, somethin’ I should’ve done earlier.

Whoa!

The BNB Chain has matured, yet the tooling gap still surprises me.

On the surface a BEP20 transfer looks trivial, though when you parse emitted events and watch for non-standard method signatures you sometimes uncover extra logic that collects tiny fees or routes liquidity in unexpected ways.

Initially I thought all projects would advertise such mechanisms, but most of them bury the details in obfuscated contract code or hide them behind proxies, which foils casual inspection unless you track the bytes and decode the call data manually.

That manual decoding is tedious but doable with the right explorer features.

Seriously?

I want to point folks to a tool I’ve used a lot.

The chain explorer I rely on not only shows token transfers and holders, but it also reconstructs internal transactions, decodes input data, and highlights verified source code when available, which speeds up my pattern recognition and reduces guesswork.

If you ever audit a token or watch for rug pulls, those layers make a very very large difference.

I’m not 100% sure every feature is perfect, but most are very helpful.

Screenshot of token transfer trace with internal transactions highlighted

Practical tip: use the explorer that reveals internal calls

Wow!

So here’s the recommendation I keep repeating to friends and teams.

Check the explorer view on the bscscan blockchain explorer to follow token flows and decode contracts.

Once you get comfortable reading transfer events and approvals you begin to predict where slippage or sneaky taxes might sit, and that ability changes how you trade or audit on BNB Chain.

This tool won’t replace manual review, but it accelerates the investigation by orders of magnitude.

Okay.

In practice I watch several critical things at once when tracing tokens.

For BEP20 tokens I look at the totalSupply changes, owner-only functions, any minting or burning patterns, and transfer hooks that call external contracts, because those are the usual suspects when projects change economics midstream.

On one hand you might see legitimate operational calls, though on the other hand those calls could be masking automatic redistribution or developer fee collectors that siphon value without clear disclosure.

Also watch allowances and approvals; they often tell you more than a single transfer event.

Whoa!

Sometimes a tiny approval reveals a pattern of repeated tiny drains.

I once traced a token with a million transfers where every 100th transfer invoked a contract that skimmed a fraction into a cold wallet, and that path was only visible after stepping through each internal call across blocks.

That took custom scripts, patience, and an obsessive eye for repeating patterns.

I’m telling you this because tooling helps avoid costly mistakes.

Common questions

What should I check first?

Really?

Look for ownership controls, mint functions, and unusual transfer hooks.

If you are uncertain, step through the transaction call trace, examine approvals, and cross-reference verified source code or bytecode patterns to confirm behavior across different blocks.

And if you still worry, ask a community auditor or a token-savvy friend…

Why this mobile wallet surprised me: staking, NFTs, and a refreshingly simple UX

Whoa!

I wasn’t expecting a mobile wallet to feel like a full finance app.

It opens fast, and the design feels intentionally uncluttered and calm.

Buttons are obvious and the icons actually make sense.

I dug in because I’d been hunting for a mobile wallet that actually made staking painless, handled NFTs cleanly, and didn’t make me feel like I needed a PhD in crypto to use it.

Seriously?

My instinct said this might be another glossy shell with weak inner mechanics.

But when I checked the staking flows, something felt different.

Initially I thought staking would be clunky and slow, but then realized the app abstracts the nonce management and network fees in ways that kept me in control without burying me in technical jargon.

It’s not perfect, though; some coin support is spotty depending on network updates.

Hmm…

I moved tokens and minted an NFT to test it.

The wallet kept me on track and didn’t hide key fees deep in obscure menus.

If you’re someone who likes to keep things elegant but still tinker under the hood, you’ll appreciate that the app offers both one-tap staking and a detailed breakdown of validator performance, uptime, and rewards projections so you can make an informed choice rather than guessing.

I ended up recommending the exodus wallet after testing; the experience felt both friendly and robust.

Screenshot of a mobile wallet showing staking options and an NFT collection view

Where staking shines (and where it doesn’t)

Whoa!

I’m biased, but I prefer wallets that don’t pretend complexity is a feature.

This part bugs me because too many apps hide crucial settings behind jargon.

Actually, wait—let me rephrase that: some power users need raw access, while casual users want safety and simplicity, and balancing those needs without clutter is harder than it looks.

On one hand it has advanced keys; on the other, the flow stays approachable.

Wow!

Fees are transparent but can spike when networks are busy.

Staking rewards are shown clearly, and compounding options make reinvestment easy.

NFT support isn’t just a gimmick; you can view collections, manage metadata, and even sign lazy-mint transactions without needing another tool, though market-specific quirks still mean some collections won’t display perfectly.

I’m not 100% sure, but somethin’ tells me they know Silicon Valley and Main Street.

Practical tips from someone who tested it in the wild

Here’s the thing.

I like a wallet that respects both beginners and power users.

It should make staking dead simple but not hide the validator tradeoffs.

On balance this app nails a lot of those tradeoffs, giving clean NFT views, sensible staking tools, and recovery options that won’t terrify your grandparents though some coin integrations lag behind the bleeding edge.

I’m optimistic, yet cautious—there’s work to do, but I keep coming back to it…

FAQ

Can I stake directly from the mobile app?

Yes, you can stake directly with a few taps; the app shows validators, reward estimates, and expected lockup times so you can choose wisely (and avoid the accidental mistakes newbies often make).

Does it support NFTs natively?

It supports viewing and managing many NFT collections natively, though a few niche or custom contract collections might require a marketplace or explorer to view completely—still, for most daily use it’s solid and very very convenient.

Is this safe for long-term storage?

It’s designed for everyday use with strong recovery options and encrypted keys; for very large holdings you might pair it with cold storage, but the app’s approach balances usability and security better than many mobile-first competitors.

Why your crypto deserves more than a password: practical advice for using a Ledger wallet

Whoa! I still remember the first time I held a Ledger Nano in my hand. It felt like a tiny safe. My instinct said this was different from just another app, but I also knew gadgets can lull you into a false sense of security. Initially I thought a hardware wallet was a plug-and-play cure-all, but then realized there are subtle choices that matter—where you buy it, how you back it up, and how you use it every day.

Really? Let me be blunt. Hardware doesn’t equal invincible. The device protects keys against malware and compromised computers, though it won’t stop a determined social engineer or a careless owner. So, we need to think in layers: physical custody, device hygiene, operational habits, and recovery plans. Those layers are simple in theory, messy in practice.

Here’s the thing. The most common failure isn’t a cryptographic flaw. It’s human error. People buy a device, jot down the seed phrase on their phone, and then wonder why an account gets drained. My advice comes from watching that pattern over and over—somethin’ about convenience beats caution every time. I’m biased, but a little paranoia helps here.

Ledger Nano hardware wallet on a wooden table

Where to buy and how to inspect on arrival

Short answer: buy straight from the manufacturer or an authorized reseller. Seriously? Yes. A used or tampered device is an attack vector. When the package arrives check seals and packaging, but don’t rely solely on them—sellers can fake seals. Instead, boot the device and confirm it asks to generate a new seed and shows the expected startup screens; if it comes pre-initialized, return it immediately.

On the device, walk through the setup with patience. Write the recovery phrase by hand on the supplied sheet (or on a metal backup if you’re ready to invest), and never photograph or store the seed digitally. Hmm… I know that sounds old-school, but digital backups are a common path to loss. Also, create a PIN and test it a couple times so it sticks in your muscle memory.

Cooldown tip: if something feels off in setup—unexpected prompts, unfamiliar icons, odd language—stop. Call support from the company’s official site (not a link in an email), and verify. On one hand most setups are boring, though actually there are subtle things worth double-checking like firmware version messages that appear on the device itself.

Daily use: verify everything on the device

Okay, so check this out—always verify addresses on your Ledger’s screen, not just in the app. When you initiate a transaction from Ledger Live or another wallet, the device will display a receiving or destination address; confirm that the address shown on the physical device matches what you expect. My instinct told me to trust the desktop UI the first dozen times, and then I learned the hard way that some malware can alter what your computer shows. Don’t let convenience win here—slow down and read the address.

Ledger Live is convenient for portfolio view and updates, but treat it like a dashboard rather than the source of truth. Use the device to approve critical actions. Also, keep Ledger Live up to date and make sure your firmware shows as genuine on the device screen when updating; if something interrupts an update, follow manufacturer guidance—do not improvise. On one deployment I delayed an update and later regretted it because it patched a known vulnerability, so firmware discipline matters.

There’s a balance to strike between comfort and caution. For low-frequency, high-value holdings, consider moving funds into a multi-signature setup or cold storage, though that adds complexity. For everyday small amounts, the Ledger Nano style device is convenient and safer than hot wallets. Decide your tiers and treat each tier differently.

Backups, passphrases, and recovery

Write down the 24-word seed and store it in at least two geographically separated, secure places. Also, consider using a passphrase (a 25th word) only if you understand the implications—it’s powerful, but if you forget it, recovery is impossible. I’m not 100% sure everyone needs a passphrase; it’s for advanced users who can manage the extra friction. On the other hand, skipping a passphrase keeps recovery simpler for heirs or emergency access, though it’s less private.

Metal backups are worth the cost if you’re protecting serious sums. They resist fire, water, and most accidental damage. And no—don’t store the recovery phrase in a safety deposit box without considering local legal exposure (oh, and by the way… think about who can legally access that box if you die). Keep a copy out of sight but accessible to your planned successor if that matters to you.

Recovery practice matters: do a dry run with a spare device or emulator so you’re familiar with the recovery flow, but never ever enter your real seed on an internet-connected device. Seriously—don’t do that. If you must recover on unfamiliar hardware, read the manufacturer guidance thoroughly first and limit network exposure while you do it.

Threats beyond malware: social engineering and supply chain

Phishing is still king. Attackers impersonate support, use urgent-sounding emails, or send fake firmware installers. If someone asks you to reveal your seed phrase to ‘fix’ a transaction, that’s a scam. Nothing legitimate will ask for your recovery phrase. My gut says this is obvious, but people fall for it all the time.

Supply-chain risk is real but rarer. That risk decreases drastically if you buy direct and check initialization on-device. Also, treat any unsolicited help with suspicion. If a supposed expert offers to ‘recover’ your wallet for convenience, decline and insist on doing it yourself or with a trusted contact present. This part bugs me—too many people outsource trust to strangers.

FAQ

Q: Can I use Ledger with third-party wallets?

A: Yes. Ledger devices are compatible with many wallets that support hardware signing. Always verify transactions on the device screen regardless of the wallet app you use. Use Ledger Live for common tasks if you prefer the official interface, but third-party tools can add flexibility.

Q: What if I lose my Ledger device?

A: If you lose the device but have your recovery phrase securely stored, you can restore on a new Ledger or a compatible hardware wallet. If you lose both device and seed, funds are likely unrecoverable. That combination is precisely what backups are for—very very important.

Q: Should I link to manufacturer resources?

A: Absolutely—when in doubt, use the official pages for downloads and support. For a starting place about owning a ledger wallet, check official resources and verified support channels before making decisions.

How I Hunt Smart-Contract Oddities on BNB Chain

Whoa, this is wild! I was poking around recent BNB Chain txs and something popped. At first I thought it was just noise from bridges or bots. But then I started tracing the smart contract interactions, reading bytecode, and comparing event logs to see patterns that aren’t obvious on the surface. I ended up finding tiny repetitive transfers and odd approval churn that suggested more than random activity.

Seriously? This felt off. My gut said somethin’ didn’t add up with the gas patterns. I ran a few queries and filtered by contract creation logs (oh, and by the way…). Initially I thought the anomalies were harmless, but after cross-referencing token holders and event signatures across multiple blocks the story shifted toward deliberate obfuscation, which raised real red flags about automated front-running or liquidity manipulation. Hmm… it was subtle, not the usual loud rug-pull pattern.

Here’s the thing. On BNB Chain explorers you can peek at token approvals and function calls. Actually, wait—let me rephrase that. Something bugs me about explorer UX though; sometimes event labels are missing or mislabeled. So I often cross-check on-chain traces with contract source verification and verify constructor params, because when source is verified you can read variable names and infer intent, but when it’s not verified you’re stuck inferring from byte patterns and logs which is tedious and error-prone.

Wow, that’s messy. Smart contracts on Binance Smart Chain are fast and cheap, which is great for iteration. But cheap txs also mean attackers can test exploit scripts cheaply and very very often. On the other hand, tools like verified contract readers and event-decoding libraries can expose attacker tactics when you stitch together transfers, approvals, and DEX interactions across a few blocks, though that requires patience and some scripting. I’m biased, but I prefer explorers showing token flows visually.

Really? Take note here. If you’re auditing a contract, check approvals, constructor ownership, and timestamps. Use the explorer’s interface to jump to internal txs and decode function inputs when possible. Initially I thought automated monitoring would catch everything, but then realized you need custom heuristics for patterns like low-slope draining where attackers siphon tiny amounts over thousands of txs to stay under alerts, which is sneaky and sometimes legal gray area depending on contracts and permissions. So, yeah—keep an eye on approval explosions and tiny repetitive transfers; they matter.

Annotated trace showing token flow between contracts

Visual checks and sharing

Wow, check this out. Check this out—visualizing flows helped me spot a recycling loop in less than ten minutes. I grabbed a screenshot and annotated suspect txs for colleagues. If you want to dig deeper use tools that link token movements to DEX swaps and contract calls so you can map value paths, and if you need a starting point I often recommend the verified contract page when available because source clarity changes the analysis drastically. For quick checks I sometimes point folks to the bscscan page I trust for tx insights: bscscan.

Really? Quick FAQs below

How do I verify a contract?

Answer: Use the explorer’s verify feature to match source and bytecode. Initially I thought verification was optional, but then realized it’s critical for readable analysis. If source isn’t verified, rely on decoded events and repeated behavioural patterns. I’m not 100% sure about some edge cases, but start there…

Loading...